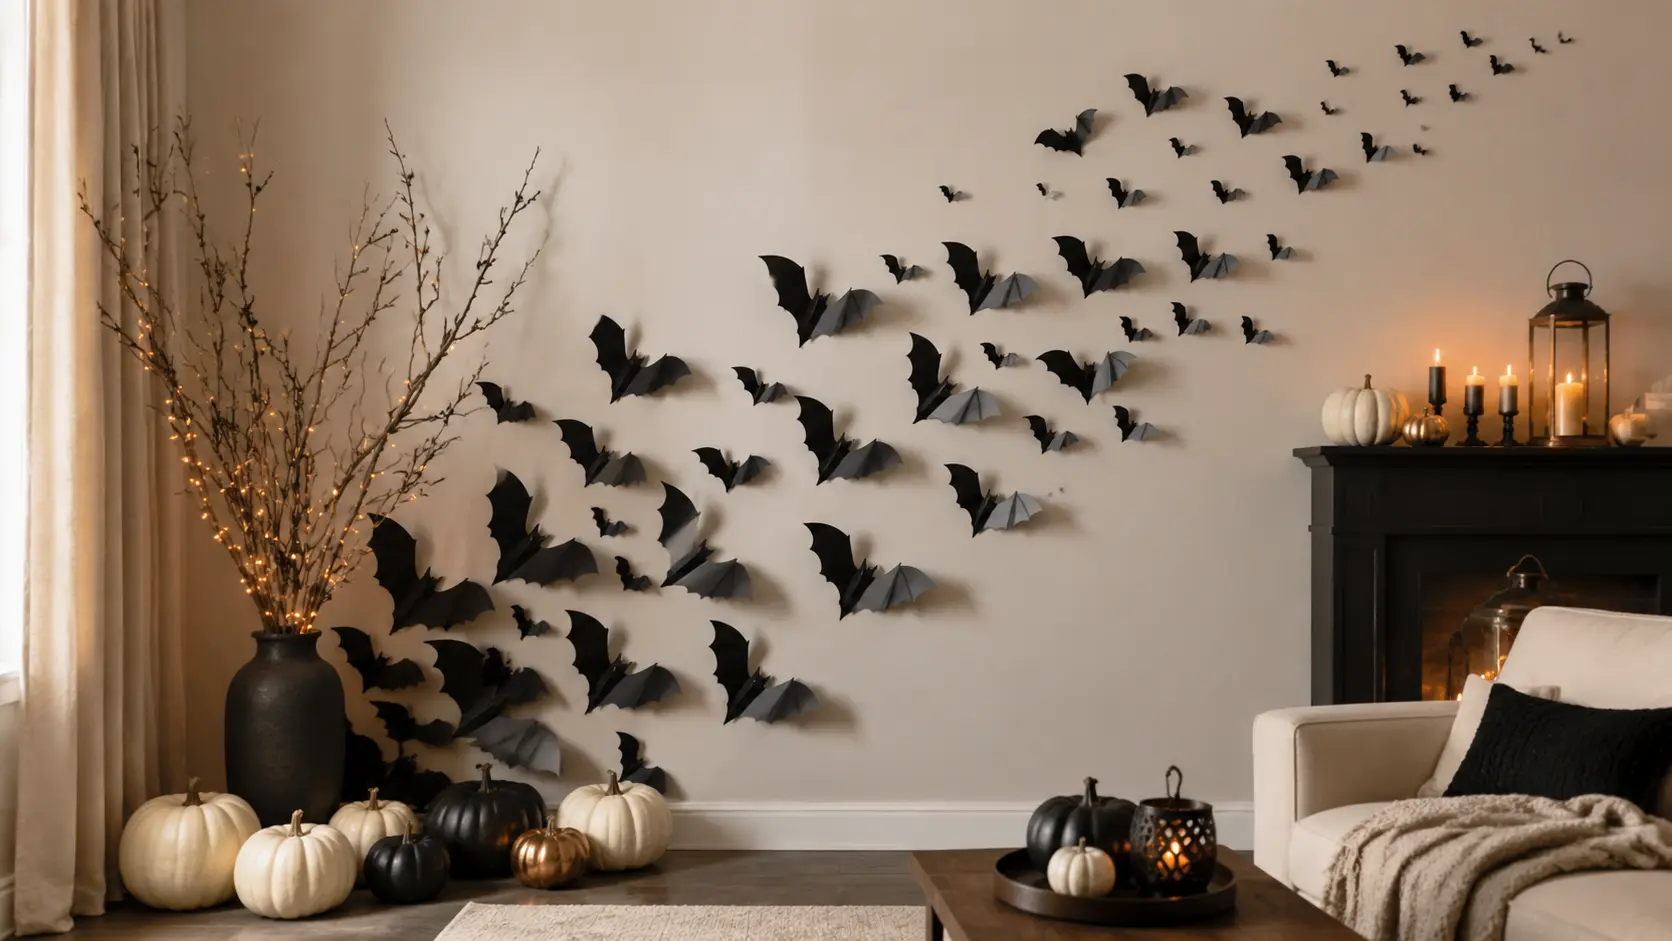
A DIY paper bat wall is an affordable Halloween decoration that can instantly transform an ordinary room into a dramatic, Pinterest-worthy display. The secret to making it look professionally styled is to use different bat sizes, create movement across the wall, add subtle 3D details, and coordinate the display with warm lighting and simple seasonal décor.
This guide explains five stylish bat wall designs, including what you need for each look and how to arrange everything beautifully.
Basic Materials for Every Design
Before choosing your preferred style, gather these basic supplies:
- Black cardstock or thick construction paper
- Bat templates in small, medium, and large sizes
- Pencil
- Scissors or a craft knife
- Cutting mat, if using a craft knife
- Removable adhesive strips or double-sided tape
- Removable foam mounting squares for a 3D effect
- Ruler
- Optional: black marker, gold or white cardstock, LED lights, fairy lights, pumpkins, lanterns, candles, dried branches, and sheer curtains
Use matte-black cardstock rather than shiny paper for a more elegant and expensive-looking finish.
Preparing the Paper Bats
Print or draw bat templates in at least three different sizes. Larger bats work well as focal points, while smaller bats help create movement and fill empty spaces.
Trace the templates onto black cardstock and cut out the shapes carefully. Prepare approximately 30 to 60 bats, depending on the size of your wall.
To make the bats look as though they are flying, gently fold each one down the centre. Bend the wings slightly forward or upward, but do not crease them too heavily. Attach some bats flat against the wall and mount others with foam adhesive to create different levels of depth.
Before attaching the bats, place them on the floor or use small pieces of painter’s tape to test the layout. Avoid arranging them in perfectly straight rows. Uneven spacing and varied directions will create a much more natural effect.
Design Idea 1: Crescent Moon Bat Swarm
The crescent moon design creates a magical, elegant Halloween focal point and works beautifully in a living room, bedroom, entryway, or above a console table.
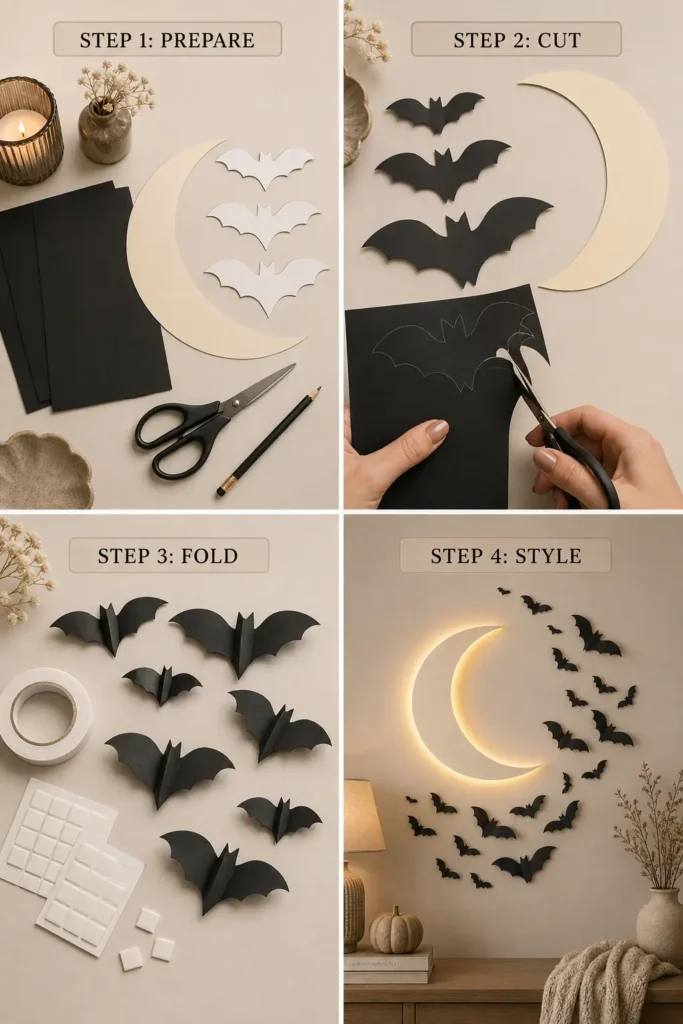
What You Will Need
- Black paper bats in different sizes
- White, cream, or gold cardstock for the moon
- Scissors or a craft knife
- Removable adhesive
- Warm LED strip lights or fairy lights
- Optional: small stars or gold dots
How to Create It
- Cut a large crescent moon from white, cream, or gold cardstock. Make it large enough to act as the main focal point of the wall.
- Attach the moon in the centre or slightly to one side of the display.
- Place the largest bats closest to the moon.
- Arrange medium and small bats around it in a curved, swirling pattern.
- Allow the bats to gradually spread outward so the design looks like a flying swarm.
- Turn the bats in different directions and slightly lift their wings.
- Add warm LED lighting behind the moon to create a soft glowing effect.
- If desired, add a few tiny stars around the outer edges, keeping the design simple.
Styling Tip
Use a neutral wall, cream accessories, and warm lighting so the black bats and glowing moon remain the main focus.
Design Idea 2: Elegant Fireplace Bat Sweep
This design is ideal for a fireplace, mantel, TV wall, or large living-room feature wall. It gives the room a sophisticated Halloween look without making the décor feel crowded.
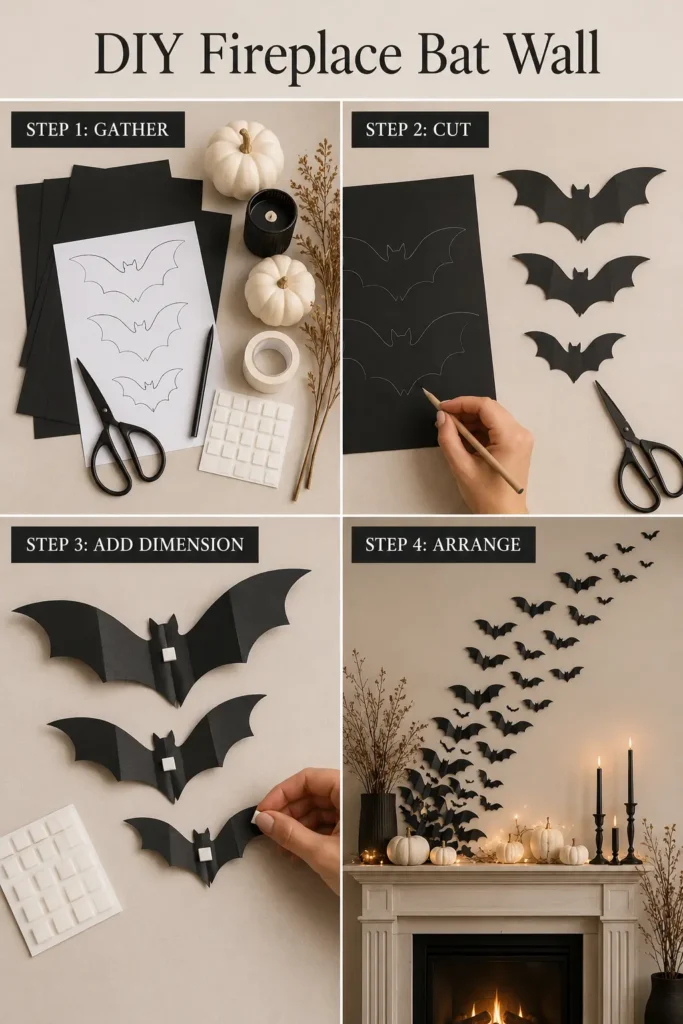
What You Will Need
- Medium and large black paper bats
- Removable adhesive or foam mounting squares
- White pumpkins
- Black candles
- Dried branches
- Neutral vases or ceramic décor
- Optional: warm mantel lighting
How to Create It
- Choose one corner above the fireplace as the starting point.
- Place several large bats close together in that corner.
- Continue the arrangement diagonally across the wall in a gentle wave.
- Gradually reduce the size and spacing of the bats as they move away from the main cluster.
- Turn some bats upward and others sideways to create a sense of movement.
- Mount selected bats with foam adhesive so their wings cast small shadows.
- Style the mantel with white pumpkins, black candles, dried branches, and neutral accessories.
- Keep the area around the bat arrangement relatively uncluttered.
Styling Tip
A black, white, cream, and warm-wood colour palette will make the display look modern and editorial rather than overly themed.
Design Idea 3: Haunted Window Bat Scene
A bat-covered window creates the illusion that bats are flying in and out of the room. This design looks especially effective in a bedroom, dining area, hallway, or reading corner.
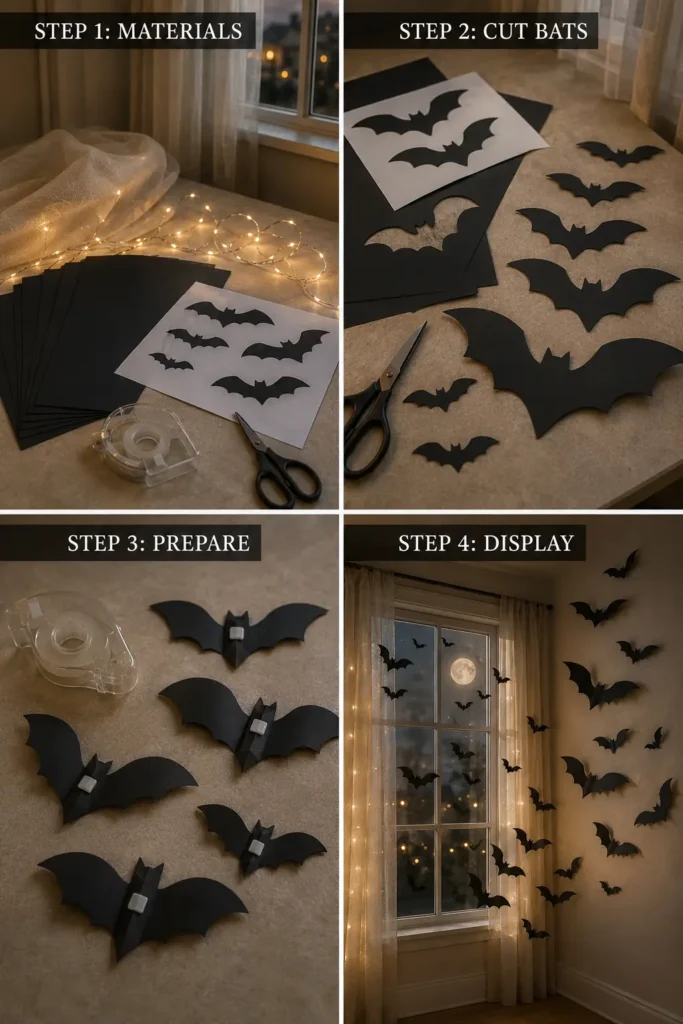
What You Will Need
- Black paper bats in several sizes
- Removable adhesive suitable for glass
- Sheer white or beige curtains
- Warm fairy lights
- A small moon decoration or circular light
- Optional: black window branches or paper silhouettes
How to Create It
- Clean the window and surrounding wall so the adhesive sticks properly.
- Attach a few small bats directly to the glass.
- Place medium-sized bats around the window frame.
- Extend larger bats outward onto the surrounding wall.
- Arrange the bats so they appear to be flying away from the window.
- Add sheer curtains to soften the display.
- Place warm fairy lights behind or around the curtains.
- Add a subtle moonlight effect using a round lamp or a paper moon placed behind the window.
Styling Tip
Do not cover the entire window. Leaving some glass visible creates negative space and makes the display look more carefully designed.
Design Idea 4: Staircase Bat Flight
A staircase is naturally suited to a flying-bat design because the rising wall creates a strong visual direction. This arrangement adds drama without taking up floor space.
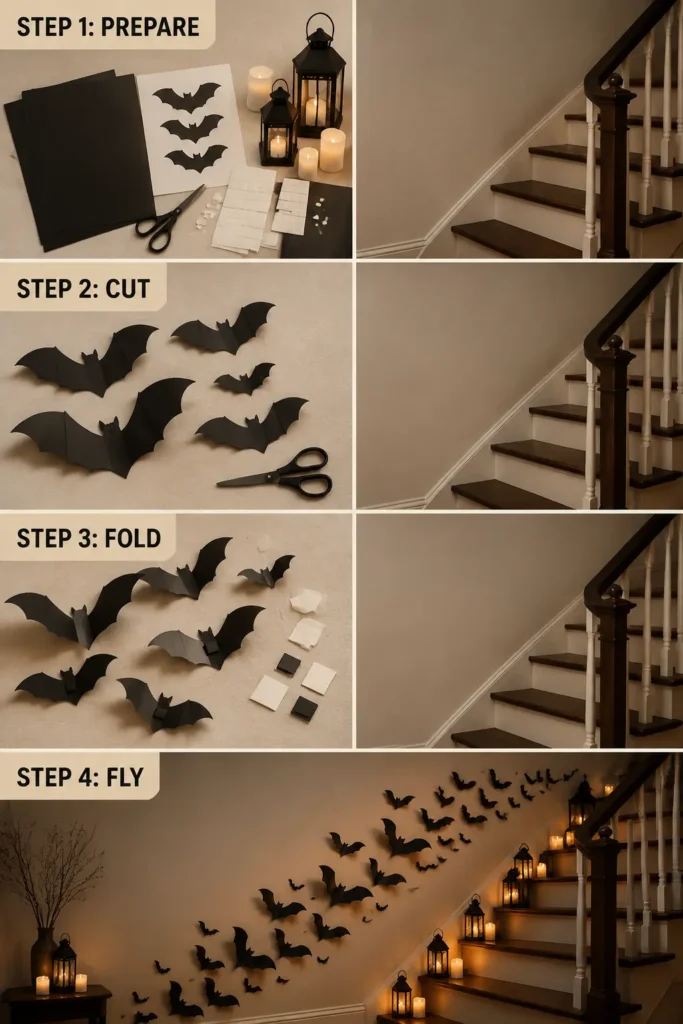
What You Will Need
- Black paper bats in small, medium, and large sizes
- Removable adhesive or foam mounting squares
- Lanterns or battery-operated candles
- Optional: a narrow black ribbon or subtle wall branches
How to Create It
- Begin with a small cluster of bats near the bottom of the staircase.
- Arrange the bats in a curved line that follows the direction of the stairs.
- Use larger bats near the centre of the arrangement.
- Gradually use smaller bats as the pattern rises toward the top.
- Place some bats close to the stair rail and others farther across the wall.
- Fold the wings of selected bats to create a floating 3D effect.
- Add lanterns or battery-operated candles along the staircase.
- Step back from different angles to ensure the arrangement flows naturally upward.
Styling Tip
Keep the stair area safe by using battery-operated lights instead of open flames and avoid placing decorations where they could obstruct movement.
Design Idea 5: Black Branch Statement Wall
This design combines paper bats with natural branches for a dramatic, nature-inspired statement. It works well in an entryway, dining room, hallway, or empty corner.
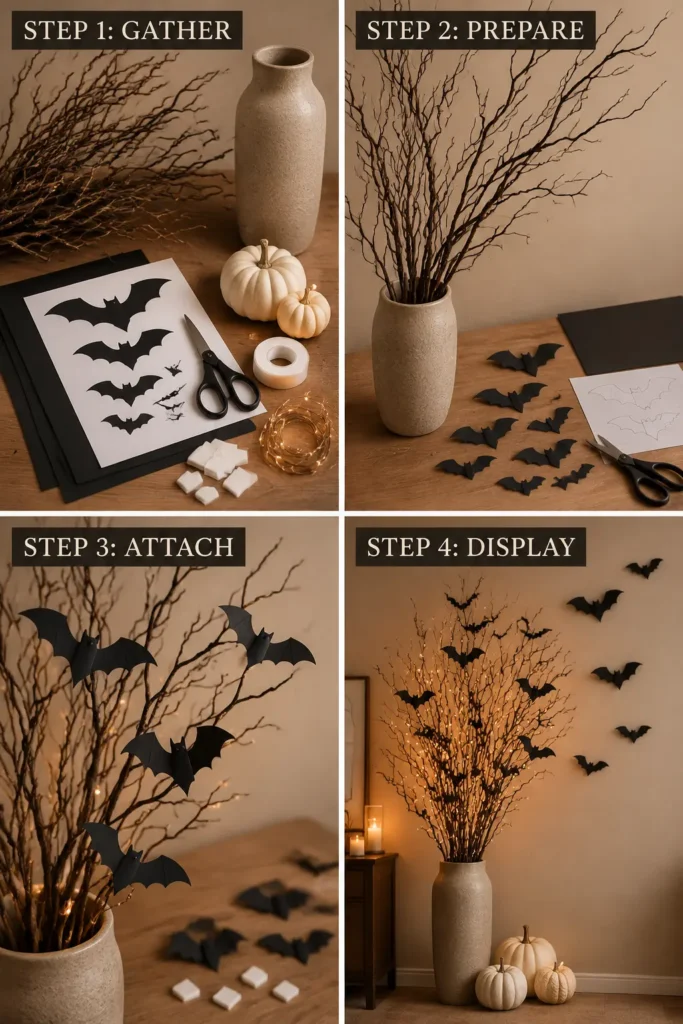
What You Will Need
- Black paper bats
- Dried branches or a large branch arrangement
- Black spray paint, if needed
- Removable wall hooks or a vase
- Foam adhesive
- Neutral pumpkins
- Amber or warm-white lights
- Optional: black ribbon or artificial ravens
How to Create It
- Place dried branches in a tall vase or secure a branch silhouette to the wall.
- Keep the branch arrangement tall and slightly asymmetrical for a modern look.
- Attach several bats directly to the branches.
- Arrange additional bats flying outward from the branches.
- Use larger bats near the branches and smaller bats toward the outer edges.
- Mount a few bats away from the wall to create layered shadows.
- Add neutral pumpkins or ceramic accessories at the base.
- Wrap a small amount of warm lighting around the branches.
Styling Tip
Avoid using too many extra decorations. The branches and flying bats should remain the main statement.
How to Make the Display Look Professional
Regardless of the design you choose, these styling techniques will make the final result look polished:
- Use at least three bat sizes.
- Keep the bats in different directions.
- Create a curve, wave, swirl, or diagonal flow.
- Begin with a fuller cluster and gradually spread the bats outward.
- Mix flat-mounted bats with raised 3D bats.
- Use a controlled colour palette.
- Leave some empty space around the display.
- Add warm lighting instead of bright white lighting.
- Repeat only a few supporting decorations, such as pumpkins or candles.
- Use removable adhesive to protect your walls and windows.